Adding a Custom Favicon to the Craft CMS Control Panel
How to add custom favicons, Apple touch icons, Android icons, and all icons to the Craft CMS Control Panel.
When building a Craft CMS project for a client or customer, we want to ensure they have the best authoring experience possible. Part of that experience is making sure the Craft CMS control panel conveys as much of the customer’s brand as possible.
You might think I’m talking about creating an on-brand Craft control panel theme. But I’m not.
I’m talking about something smaller but also important: custom favicons, touch icons, etc. for the Craft CMS control panel.
I told you it was a small thing.
Before we get started adding our custom control panel favicon, let’s make sure we first have our icons already created. I have my icons automatically created through my Vite build system. It takes a larger, high quality source PNG image and processes it at build time into over fifty different flavors of icon.
But to follow this tutorial, you don’t need that many icons. You really only need one: favicon.ico. A quick search on Google will help you find an icon generator, or you can use one you already have for the front-end of the site.
To make the icon appear in the control panel, we need to inject our own custom code in the head element of every control page. We do this through a setting in our config/general.php settings file.
You likely already have a lot of configuration settings in this file, so let’s add it to the bottom. We start with the key of cpHeadTags and then open an array.
'cpHeadTags' => [

]
Each tag that you want to insert is configured as its own array, with the name of the element (e.g. link), and then its attributes. We can insert any custom element we want; it’s not limited to icons.
Let’s add our first general favicon:
'cpHeadTags' => [
	['link', ['rel' => 'icon', 'href' => '/dist/assets/favicons/favicon.ico']]
]
The first element in the array is the tag type (link), then the nested array contains the attributes for that link element. We tell it the type of link and the path or URL to the image. Double-check that you are using the correct path to your favicons or icons; otherwise, you’ll get a 404 error logged in your browser’s network tab.
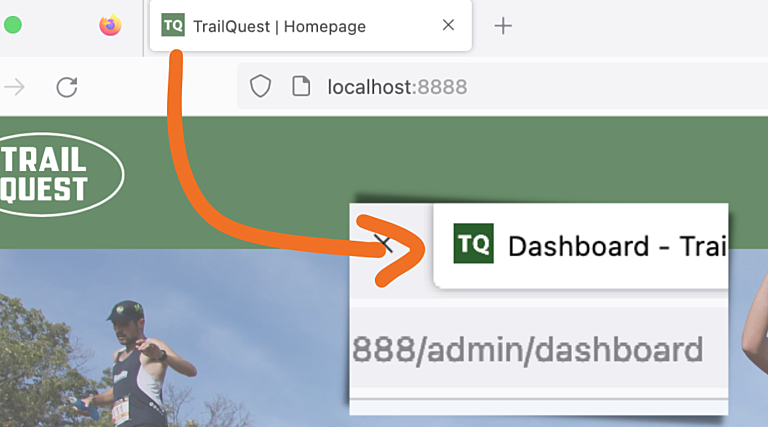
Reload the control panel (any page will do), and you should see the icon in the browser tab:

As well as the link element in the source code:
![]()
At this point, we can add more tags to our head element. Let’s add some additional images, so we cover all of the basics.
'cpHeadTags' => [
    ['link', ['rel' => 'icon', 'href' => '/dist/assets/favicons/favicon.ico']],
    ['link', ['rel' => 'icon', 'sizes' => '32x32', 'href' => '/dist/assets/favicons/favicon-32x32.png']],
    ['link', ['rel' => 'apple-touch-icon', 'sizes' => '180x180', 'href' => '/dist/assets/favicons/apple-touch-icon-180x180.png']]
]
And now we have three different link elements loaded in the head of every control panel page. As I mentioned before, this configuration item isn’t limited only to adding favicons. You can inject any valid element into the head of the control panel without much effort.
Now our project is on-brand in big and small ways. Here’s to a good authoring experience for our customers and clients!